Initial Connection and Data Sync
If this is your first time connecting your Quickbooks file to Qfactor, welcome aboard.
If you are here to reconnect your file, thank for your patronage, the steps are the same except you have to remove the existing Qfactor application from Quickbooks. Click here to learn how to do that.
You must have admin credentials for Qfactor and Quickbooks in order to access secure features.
Start by logging into Qfactor and Quickbooks open.
* Note: The size of your Quickbooks file determines how long an update takes. The smaller the file, the quicker the update.
A large file >200Mb may take awhile to run (an hour or so?) so you might want to start it before lunch time or at the end of the day.
Qfactor Connection Setting
In Qfactor, navigate to Account pull down on the upper menu bar, select Connections.
Select Quickbooks Desktop Icon, this will bring up a new page with a file download link
Click on Download and save the file in an easy to remember and access location on your computer.
Quickbooks Add Application and Data Sync
Now head over to Quickbooks. Firs thing is to switch into Single User Mode (from File menu) - in order to switch to single user mode, other users must be logged out. If they are not, there is an option to force them off or you can notify them so they can close out their work.
If this is your first installation, ignore this step and go on to the next.
If you are here to update your Qfactor -> Quickbooks connection, this step is for you. Let's remove the file that's here.
The next step is to click on Add an Application.
After clicking on this, you will be directed to find the QWC file you downloaded from Qfactor.
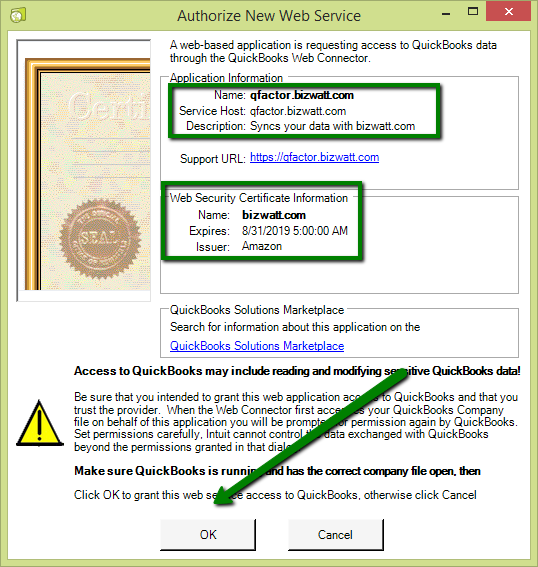
Next you will see a notification telling you what's about to happen and information providing security certificates for Qfactor.

Click okay to proceed to provide levels of permission and access to Quickbooks data.
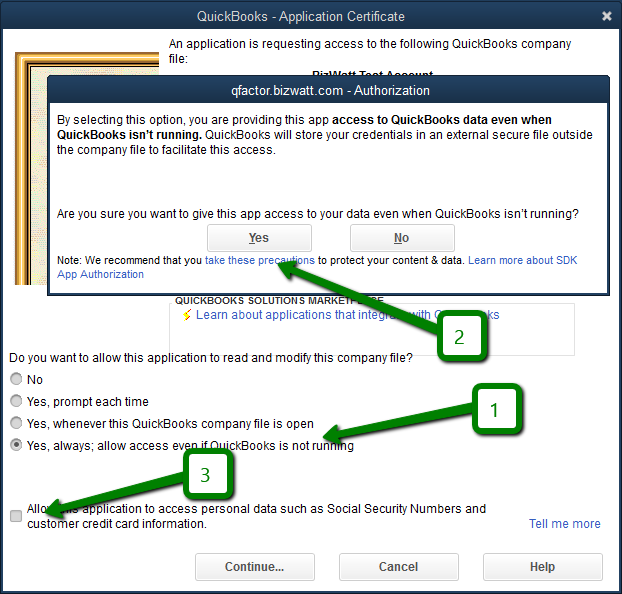
First, click on "Yes, always;", this lets Quickbooks update Qfactor when you are not logged in to either application. This will not work if the computer running Quickbooks is turned off.
After clicking the radio button, the small screen making you want to do this, click Yes.
Check the box "Allow this application to access personal data..."
BizWatt and Qfactor will not download Social Security Numbers or credit card information. We have no reason to. Quickbooks put your employee payroll information behind the same security feature. Qfactor reads your employee name and their pay rate so we can report on project costs based on who worked on the project. For this reason, we need access to this area of data.

Once you complete this process, you are almost ready to sync data between Quickbooks and Qfactor. First we have to enter the password from Qfactor into Quickbooks to complete the secure connection. Go back to the Qfactor Quickbooks Desktop webpage you left open, copy the password from the screen.
Back to Quickbooks, click on the blank Password field next to Qfactor and paste the password. Sometimes a new dialog box comes up you can paste in. Make sure your password doesn't get added twice, it's a quirk in Quickbooks that you have to watch out for.
You should be back at the screen below. Check the box next to Qfactor and click the Update Selected button.
* Note: The size of your Quickbooks file determines how long an update takes. The smaller the file, the quicker the update.
It may take awhile to run (an hour or so?) so you might want to start it before lunch time or at the end of the day.
A completed setup and successful sync looks like this...
It is not uncommon for Quickbooks to throw errors the first time you do this. The first thing to check is the password. Copy and paste it again into the password field. Try updating again. If this doesn't work, Exit Quickbooks Web Connector, close Quickbooks and restart it.
If you are not successful, do not hesitate to contact us through the support portal...